Home Assistant: Exploring location history

If you’ve managed to set up a good source of location data in Home Assistant, then there is a good chance you will have tried and been a bit disappointed by the out of the box MapCard. While it can get your trackers showing on a map, when it comes with digging into the history data the functionality is painfully limited.

As a big user the rich capabilities available in other areas of Home Assistant, such as the energy dashboards, I set out to find a way of getting similar capabilities for location data on maps as well.

One of the great things with Home Assistant, and Open source projects in general, is that when you do find a gap like this you have the chance to get involved and solve your own itch. As someone with very limited experience with Home Assistants frontend codebase, I decided my best bet was find someone who’d created a HACS Map Card already, and see if I could use that as the basis to build out my Wishlist

As luck would have it @nathan_gs‘s ha-map-card perfectly fitted the bill.

Rather than jumping straight into the deep end with and trying to make the date picker work, I initially started off picking up some more standard features and bugs from the Github issues. I find this is a good way to get a feel for a new codebase and its conventions. The use of web components and the Lit library were all new to me, so despite my best efforts I did have to read through a little documentation as well.

Fortunately, Nathan turned out to be incredibly receptive to the random features I started throwing his way, which is always a huge encouragement when you start tinkering with something new.

Getting date ranges working

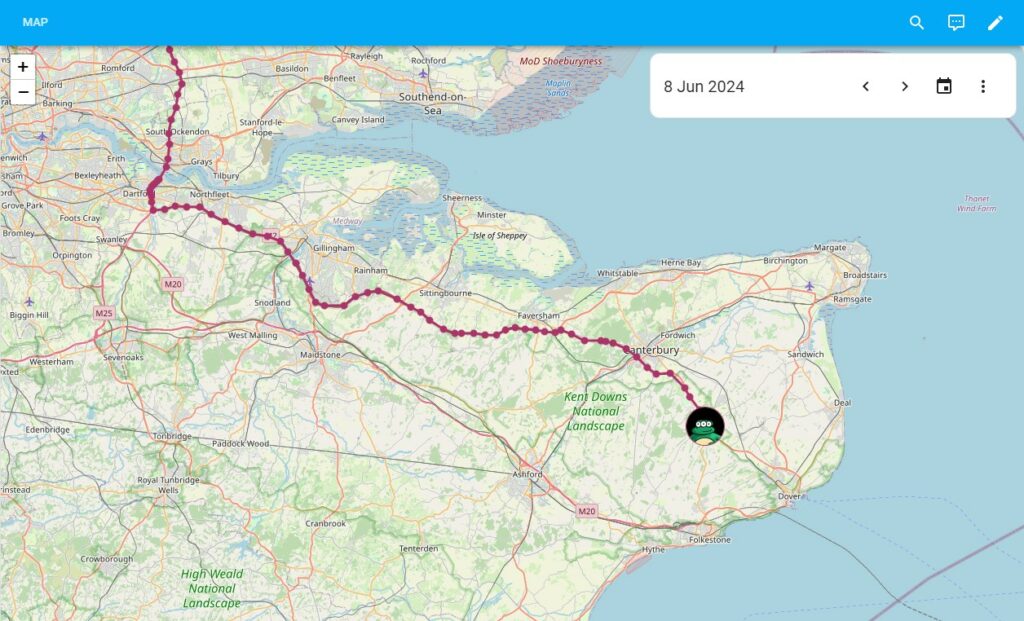
Once I felt I had a basic handle on the codebase, I decided to go after my main wish list feature. Integrating with Home assistants built in energy-date-selection component. The component itself is great, providing the ability to easily navigate history, select date ranges and more. Right now its very much tied to Home Assistants energy dashboard – although I hope at some point in the future Home Assistant choose to make it available as a more general feature.

Despite it being meant for the energy dashboards, as the screenshot above shows, it turns out it can indeed be used to drive other features. Most notably the map history.

I knew setting out that hooking into the date selection card must be possible as I already used a number of Home Assistant Cards that do so, the awesome ha-sankey-chart for one. Inspired by the Sankey Chart Card approach, I followed the model to create a “DateRangeService” that would take responsibility for waiting for the Home Assistant _energy connection to be ready, then manage the subscription to it once it was. I was then able to use the service to register call-backs in the card, allowing each entity to trigger a redraw of history data whenever the date range was changed.

Following on from the initial prototype, I ended up cranking out a number of minor features for the Map Card over the last week or two, further exploring some of home assistants internal capabilities.

Highlights include

  • The ability to have card level history date ranges and optionally override these individually for each entity.
  • The ability to use external entities to provide history date range values (For example an input_number to drive the hours or days ago.) This provides an alternative mechanism for exploring the history data. You can even mix and match them.
  • Adding more detail to the tooltips and entities themselves, including handling the click events and triggering home-assistant modals.

In Summary

Although still fairly new, I think the ha-map-card represents a pretty monumental improvement to home-assistants mapping and location data exploration capabilities. It provides significantly greater control over how location information is used and displayed, as well as several other advanced features including the ability to configure custom tile layers and web mapping services.

For people looking to get more location data into tehri Home Assistant, if you are a google maps user I’d recommend installing pnbruckner/ha-google-maps via HACs as a nicer way to setup access to your location history.

If you would like to set up a page similar to my screenshot does, you’ll need to install card-mod (to add a little extra CSS) then setup a new tab with the “Panel (1 Card view)”.

My YAML for the card then looks roughly as follows

type: grid
square: false
columns: 1
cards:
- type: energy-date-selection
card_mod:
style: |
ha-card {
z-index: 999999999;
position: absolute;
height: 80px;
width: 80%;
background: #fff;
top: 75px;
right: 10px;
max-width: 450px;
}
- type: custom:map-card
history_date_selection: true
zoom: 10
card_size: 16
entities:
- entity: device_tracker.your_entity_1
- entity: device_tracker.your_entity_2
- entity: device_tracker.your_entity_3
- entity: device_tracker.your_entity_4
...

Not perfect, but hopefully a nice starting point for a more easily explorable map.

Final thoughts

Having now worked on this and another simple card, I have to say I’ve quite enjoyed the experience of developing in the Home Assistant ecosystem.

That said, the learning curve was somewhat steeper than I expected, simply due to the difficulty in finding any definitive docs on how to go about most things. While there is a boilerplate card and a lot of info filed away in forum posts, I ended up spending the majority of my time reading the source of other cards in order work out how achieved things. Looking back, a lot of it now seems pretty obvious, but that was definitely not the case when I first started poking around.

Some of this may well just be me being rusty, I’ve primarily been an API developer the last few years, so my familiarly with things like Lit and TypeScript were minimal. (Although I did manage to sidestep the Typescript for now at least).

It did also seems a bit odd that so far as I can tell, there is no proper way to ask Home Assistant to load built in card components without needing to have Home Assistants own card on the page to do so. As a result you end up having to reinvent wheels, despite there being a perfectly good component in Home Assistant already.

All that said, after a bit of effort I managed to get my head around the basics and build out some features I’ve been desperate for for ages. You can’t really ask for anything more than that.

Make use of Octopus Power-ups using a Solis Hybrid inverter.

Octopus energy recently announced they would be offering Power-ups; short periods of free electricity to customers in certain areas.

As one of the lucky people living in a Power-ups area, I wanted to quickly put together some basic notes on how to configure a Solis Hybrid Inverter to charge from the grid during these times. See https://octopus.energy/power-ups/ to find out more about the scheme.

Note: This is all just my personal thoughts. I’m not an expert and information may be inaccurate so listen to me at your own risk. If you are not comfortable changing these settings – don’t. I’m fairly sure you could break your install or worse by incorrectly changing settings within these menus.

While everything mentioned here can be managed directly on the Inverter, the steps below our done using the remote management tool on Solis Cloud. If you have not already, you will need to manually request access to this at https://solis-service.solisinverters.com/en/support/solutions/articles/44002373796-inverter-remote-control-application

Once approved, you will likely need to log in and out again to see the new buttons.

Setting the Inverter to charge from grid during the Power-up.

To start, enter the management console. From the plant overview screen select your plant (there should normally just be the one).

In the left hand menu you should then see a tab labelled “Device”, click this and you should see a list of inverts. Select the inverter serial number to view the Inverter itself

Then in the top right you should see the following buttons. Select “Inverter control”.

At this point you will need to re-enter your password and agree to the warning.

Now you should see a Control panel similar to the following.

To start select Work Mode, then select Self-consumption from the options avaiable.

You should then see a screen that looks like the below.

First, confirm self-use mode switch is on by clicking into Self-Use Mode Switch and confirming current value is “enable”.

Next enter Charge and Discharge.

Here I set charging current1 to 50Amp (the default), leaving discharge as 0 (as I don’t want to export). I also set the charging time as the period for the upcoming “Power up”. In my case 2pm till 4pm.

Unfortunately you can’t schedule this in advance so you’ll have to set this on the day, then turn it back off again afterwards or you risk it charging the battery on days when grid power is noticeably less free.

Now that is done, you can click in to Time of use switch and enable it. This pretty much just tells the inverter listen to the charging/discharging times you selected previously. These are ignored once this is turned back off.

Finally, select Allow Grid Charging, and enable it.

And then it is just a case of waiting for the “Power up” to start.

Assuming all is well your battery should begin to charge at around 2.5kW. This will first use any solar generation you have (as this goes direct to the battery), and then top’s up the rest from either spare power capacity in your home or the grid.

That said….

Please do remember to disable the “Time of use switch” and potentially “Allow grid charging” options after the power up is complete. If you forget you will end up paying for the grid import the next day when the defined charging slot comes around again.

A few more notes.

  • Everything described here was tested on my own solar “plant”, a 3.4kW Solis Hybrid Inverter with 2 Us3000c PylonTech batteries.
  • My home setup was previously in its default “self use” mode state after it’s installation.

I did find two particularly interesting things that were not originally clear to me when setting this up.

  1. While in self use mode, even with allow grid charging on – your system will not charge from the grid unless its during a charging period (configured in the charge and discharge settings).
  2. Better still – the charge from grid settings naming is slightly misleading. What it actually appears to mean is “Allow inverter to charge battery from an AC source”.

Why is this interesting?

Well, if you happen to have a second solar setup in your home (like I do from an older install), enabling this will actually allow your battery to charge using the spare AC capacity generated by the system, while not touching anything from the Grid itself. I’m fairly sure this only works due to my hybrid inverters CT clamp being on the main power from the house, allowing it to detect if there is spare capacity that’s currently being exported. I assume this is the standard approach, but best to confirm if you are unsure.

Its worth noting that the same configuration options could also be used to set a non “Power up” based charging schedule (given that is what they are actually intended for), for example if you get cheap power over night or similar. Given I don’t get that, the “Power up” was my first time touching any of these options. As such, I thought someone out there may find it useful to have this all written down, given the manual wasn’t quite as clear as I would have preferred

Thanks for reading.

That’s pretty much all there is to it.

Let me know if this was helpful or if I missed anything that’d be good to know.

Larahook: Hooks for Laravel

In SaaS or similar applications, there often comes a point when you want to start adding custom or tweaked functionality for clients without the codebase itself diverging. One of the most common solutions to this is to use hooks.

Hooks effectively allow you to make certain parts of your applications functionality open to modification by another part. My own usage of this for instance is allowing a single white label configuration file to adjust (in some cases quite deeply) how the larger application works. WordPress is probably the most well known for using this approach in order to allow its plugins and themes to easily interact with WordPress’s functionalty, without needing to make any changes WordPress’s own code.

To support this functionally in a Laravel application, for the last few years I have been using the wonderful esemve/Hook library by Bence Kádár. Unfortunately the library now appears to be mostly inactive – most critically lacking support for Laravel 8 (as well as PHP8 itself in some areas).

As such, with an growing requirement for additional functionality and updates, I decided to take the plunge and create a new maintained fork of the library.

Github profile for the coinvestor/larahook library.

Although for simple use cases coinvestor/larahook can be used as a drop in replacement for the original esemve/hook, I utilised the opportunity of it being a clean break to make some more involved changes to the libraries functionality.

The most important changes are listed below.

Laravel 8 and PHP 8 compatibility plus auto-discovery support.

The library has been updated to work with the latest version of Laraval, as well as to make use of the newer package auto-discovery features meaning you will no longer need to update your app.php directly.

Retired the initial content parameter, and replaced it with $useCallbackAsFirstListener.

In the original version of the library, you needed to specify both a call-back (to run when the hook was not being listened to) as well as optionally a default $output value to be passed in as the 4th parameter to the get hook method. This lead to some confusing code where a hook would need to invoke the original call-back directly to get a default value (where output was null), but if a second hook had run previously, may instead include data in the $output the hook would need to be aware of.

To simplify this I changed the 4th parameter on get to instead be a Boolean called $useCallbackAsFirstListener, as such by setting this as true, the hooks default callback will always run and pass its value in as the $output value for every subsequent listener. As such listener logic can be simplified to always expect to be working with the value of output. For now this option is left as false, as in the case where the default hook is taking an action (say sending an email) this behaviour would not be desired, and so for safety must be specifically enabled.

Listeners at the same hook at the same priority will no longer overwrite each other.

Unlike the original version of the library, lara-hook will allow multiple hooks to be registered on the same event at the same priority level. In the case this happens the hook listeners will be run in the order they are registered.

If you are making use of the original functionality where hooks at the same priority overwrite each other, code changes will be needed.

Support for falsely return values.

In our application there were a number of cases where we’d wanted a hook listener to return a falsey value back to an underlying function. This was previously not possible, as a hook returning false would trigger an abort – causing the hook to return the default value (rather than the falsey value itself).

This is no longer the case in larahook, meaning the Hook:stop(); method will now have to be used directly where a hook does need to abort, as 0/false/nulls will simply be returned from the hook like any other value.

New Methods: getListeners, removeListener and removeListeners.

Listeners can now be unregistered, both individually as well as all listeners for a specific hook.

Additionally a full list of listeners on a hook can be returned using the getListeners method.

Test and bugfixes.

In addition to the functionality changes, I also spent some time adding unit tests and basic CI for the library. As is always the case when adding tests I managed to find and fix a number of minor bugs and edge cases across the library.

If you’d like to swap over to the new library, please have a look at our repo at https://github.com/CoInvestor/larahook/

Github actions: Run CI when specific reviewer or label is attached

Given the challenge I had in my own recent googling, I thought it would be worth while putting together this quick blog post to provide a simple/direct answer as to how to configure a GitHub Action on a pull request, so that CI tasks are only run when a certain reviewer has been added.

Quick background

  • We had a large application with a significant test suite.
  • We try to create our pull requests early in the development of a feature to aid visibility.
  • We need all pull requests to require a successful run of the test suite before they can be merged.
  • Finally: We didn’t want to keep run the test suite over and over unnecessarily (for example every time the branch is pushed to while being developed).

As such our preferred mechanism was for the test suite to only run when a specific reviewer is attached to the pull request. In our case the reviewer is our service account.

Solution

Lets assume our existing Github action looked something like the below. The Github action is set to run whenever a new PR is opened, a new reviewer is added or when new commits are pushed in to the pull request itself.

name: ci

on:
  pull_request:
    types: [ opened, review_requested, synchronize ]

jobs:
  run_our_ci:
    runs-on: ubuntu-latest
    steps:
    - name: Run our CI
      run: |
        echo "Hello world!"

Currently this will be run every time one of those actions takes place, which isn’t something we want. The basic solution is to add a condition to the task, such as the below.

if: contains(github.event.pull_request.requested_reviewers.*.login, '<CI_SERVICE_ACCOUNT>')

The above will cause triggered actions to skip whenever the condition is not met. The condition in this case being that one of the attached reviewers has a login name matching <CI_SERVICE_ACCOUNT>.

The same can be achieved with a label instead using something along the lines of

if: contains(github.event.pull_request.labels.*.name, '<LABEL_NAME>')

With the above condition added to your task, your YAML should now resemble the below

on:
  pull_request:
    types: [ opened, review_requested, synchronize ]

jobs:
  run_our_ci:
    if: contains(github.event.pull_request.requested_reviewers.*.login, '<CI_SERVICE_ACCOUNT>')
    runs-on: ubuntu-latest
    steps:
    - name: Run our CI
      run: |
        echo "Hello world!"

If you now open a pull request with the above, you will note that each commit continues to get a “tick” next to it – but when you click in for detail the task itself will have skipped.

It is also worth being aware that making a base task skip will also cause any tasks that depend on it to skip as well (ie. any referencing the task as a “needs:”. This is useful in that you don’t have to add the “if” to every task, but can also be annoying given that tasks are considered to been run successfully (and skipped) rather than having not run at all by the Github protected branch feature.

This presented us with an issue, as due to the protection rules seeing “skip” as a “success” state, the branch protection rules will now happily let you merge a branch without any CI being run on it, something we certainly didn’t want.

To work around this (although not ideal), and ensure the branch protections do enforce that the full test suite has run before allowing a merge, we can add an inverse version of the job such as the below;

no_ci_has_run:
    if: "!contains(github.event.pull_request.requested_reviewers.*.login, '<CI_SERVICE_ACCOUNT>')"
    runs-on: ubuntu-latest
    steps:
    - name: "No tests have run"
      run: |
        exit 1

This task will explicitly fail whenever the main CI steps have been skipped. By adding this as a “required” check in your protected branch settings, you can therefore ensure that people can only merge the branch when the the full test suite has been run & passed on the given pull request.

This works due to the no_ci_has_run task “skipping” when the test suite is being run – which as mentioned above the branch protection feature sees as a success.

TLDR

The combined github actions YAML may look something like the below.

  • The real CI task will only run when CI_SERVICE_ACCOUNT is added as a reviewer.
  • The no_ci_has_run task is run whenever it is not, preventing the branch from being mergeable (If you use branch protection)
  • Multi step tasks will automatically skip if a previous task’s conditional fails.
name: ci

on:
  pull_request:
    types: [opened, review_requested, synchronize ]

jobs:
  run_our_ci:
    if: contains(github.event.pull_request.requested_reviewers.*.login, '<CI_SERVICE_ACCOUNT>')
    runs-on: ubuntu-latest
    steps:
    - name: Run our CI
      run: |
        echo "Hello world!"
 no_ci_has_run:
    if: "!contains(github.event.pull_request.requested_reviewers.*.login, '<CI_SERVICE_ACCOUNT>')"
    runs-on: ubuntu-latest
    steps:
    - name: "No tests have run"
      run: |
        exit 1

Replacing the ethernet port on a Reolink CCTV Camera

A quick write up on replacing the ethernet port on a “Reolink 5MP PoE” in case anyone else ends up needing to do this. My own issue stemmed from water getting inside the port and rusting through the wires in the original connector (My own fault due to how I’d set it up) – meaning the device was unfortunately pretty much dead without more drastic action.

My original plan was just snip the port off and wire as it as a normal RJ45. This turned out to be a little less straight forwards, as after cutting the end off I was greeted with 6 wires (including a white and purple) rather than the 8 I was expecting to see.

After cutting apart original port to see what was going on, I was able to determine pin 4/5 were wired to white and 7/8 were wired to purple, which after reviewing a super helpful wikipedia article finally made sense again (see the “10/100 mode B, DC on spares”).

Deciding to chance it, I rewired the port as;

  • Pin 1: White/orange stripe
  • Pin 2: Orange solid
  • Pin 3: White/green stripe
  • Pin 4: White
  • Pin 5: Empty
  • Pin 6: Green
  • Pin 7: Purple
  • Pin 8: Empty

I’m happy to report the above resulted in my camera coming back to life (despite my questionable wiring). My guess would be that pin 5 and pin 8 with white and purple respectively would also work just as well, although I’ve not tested this myself.

As with any “DIY” on electronics, make sure you know what your doing and are aware of the risks before attempting anything. There’s always a solid risk you’ll just end up bricking your device, shorting your POE switch or worse.

Hope anyone in the same predicament finds this handy – or at least doesn’t need to do quite as much head scratching before getting it all working again as I did.

By Carl on July 12th, 2021 in General