Ubuntu 11.10 – Setting up with LXDE
I like Ubuntu, it’s not every ones favourite linux distribution, but for me, it’s always done what I’ve needed it to. Installation is simple and painless, and almost everything I want comes with it out of the box. Or at least it used to.
Maybe I’m just falling into the “I hate change” trap, but Unity, for me at least, just isn’t what I’m after. Despite a number of attempts to get used it it, it just feels awkward to use and doesn’t really fit with the way I want to interact with my computer. Switching back to the gnome environment doesn’t really do the trick either, as I just find myself annoyed at how the gnome 3 “classic” mode has stripped out so many of the features I took for granted. Gnome 3 itself… lets not even go there. So there is the problem, as much as I like Ubuntu, it no longer provides me with an interface I’m comfortable with.
Rather than just continue to moan about all this stuff at great length, I decided I would actually spend a little time being semi-constructive and have a tinker with some of the other options out there (XFCE and LXDE being the main contenders). Since I’ve used xfce in the past, I opted to give my attention to LXDE.
I already had a blank Ubunutu 11.10 installation sitting around in VirtualBox, so I decided to use that as my base, rather than downloading and installing the proper lubuntu installation.
To begin, I booted up virtual box and logged in to the Ubuntus default unity environment. Then to add the LXDE desktop, I opened up the terminal and ran:
sudo apt-get install lxde
After agreeuing to its demands (50 or so mb of space) and waiting for it to complete, I logged out, switched my environment from “Unity” to “LXDE” (right click the cog next to the login box to select this) and logged back in.
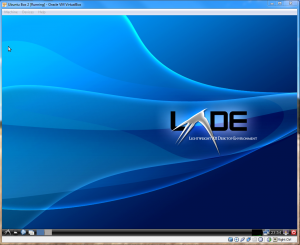
I was then greeted by the following functional (although not especially pretty) desktop.
Although not as fully featured as gnome, I was happy to find the interface provided pretty much everything I wanted (including the ability to freely customise the panels). The only real issues I found with the interface, was the clunky and cluttered menu, and its (in my opinion) somewhat unattractive looks. Thankfully, this being Linux, both issues were fairly straightforward to solve.
My first target was the start menu, having come from a windows system the thing I missed most in the menu was the ability to quickly search for what I was after. To solve this problem, I opted to use Cardapio as it offered the above functionality in addition to being stand alone (making it easy to get running).
To get cardapio installed, you’ll want to run the following 3 commands in the terminal which will add the cardapio repository and then download cardapio itself (along with tracker – in order to allow file searches, and python-glade2 which is a missing dependency of cardapio).
sudo add-apt-repository ppa:cardapio-team/unstable
sudo apt-get update
sudo apt-get install cardapio tracker python-glade2
Once cardapio is installed, the next step is the slighly more difficult task of setting it up in place of the default start menu. Since I was unable to find any reliable documention on how to do this properly, I fiddled around and finally settled on the solution of “botching” it by replacing the panels “Menu” with an “Application launch bar” containing only the cardapio icon.
To do this right click the taskbar and select “Add / Remove panel items”. Then in the dialog, select “Add” and “Appliction launch bar”. This should place the new “appliction launch bar” on the end of the panel, use the up button to move it in front of the existing “Menu”. Double clicking this will now give you the opportunity to add applictions to the “launch bar”. Unfortunately, Cardapio is no where to be seen.
This is becuse cardapio by deafult is set to hidden. To fix this, in your terminal window run.
sudo nano /usr/share/applications/cardapio.desktop
Then using nano, change the value of “NoDisplay” from true to false and save over the original file.
On opening your appliction launch bar again, you should now find Cardapio helpfully listed under “Accessories”. Hit add to move it in to the Launcher, then close the window and give it a try.
With a decent start manager now in place, the next step is just to pretty it up.
To start with I right click the task bar, selected “Panel Settings” and changed the panel Edge to “top” (to place the panel at the top of the desktop). Then in the “Appearance” tab, I change from “Image” to solid “color (with optacity)” and adjusted the colour and opacity in order to provide a semi-transparent black taskbar.
Next, install avant-window-navigator (my dock of choice) using:
sudo apt-get install avant-window-navigator
Once installed, open the start menu and select AWN (just search avant) which should start it running. Don’t worry that it looks hidious at this point. Just right click the dock and select dock preferences, then in the main panel tick the box that says “start Awn automatically” and close it.
To make AWN (Avant Window Navigator) display correctly, you will now need to install and enable a “compositor”. I opted to use “xcompmgr” for this purpose. Install it using:
sudo apt-get install xcompmgr
And to ensure it starts up whenever your copy of ubuntu does, You’ll need to create it a new startup entry.
Run:
sudo nano /etc/xdg/autostart/XCompmgr.desktop
And add the following data:
[Desktop Entry]
Encoding=UTF-8
Name=XCompmgr
Type=Application
Comment=XCompmgr--a light compositor
Exec=xcompmgr
Terminal=false
OnlyShowIn=LXDE
Once this is done, save, then logout and in again to see the effects.
Now you have a dock, there is not much point having your running applictions listed up top, so right click the panel, select “add/remove items” and remove the “Task bar” and any other unwanted bits from it.
You can also right click AWN and select a more fitting theme within dock preferences.
To finish off prettying up the desktop, I’d suggest changing the desktop background by right clicking the desktop, selecting preferences and then setting it to use an image of your choice. Adjusting the Theme can then be done using lxAppearence (I stuck with clearlook but switched the highlight colour from orange to dark grey) and Configure the window chrome using the “openbox configution manager”. I switched the theme from “Onyx” to “Carbon”.
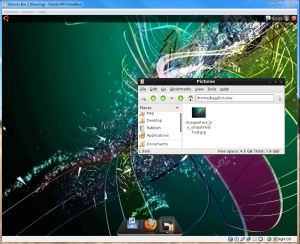
The end result, with a little luck should now be a somewhat prettier looking LXDE, with a decent start menu and a nice dock. What’s more, even with all the extra stuff, It’s still quite noticeably nippier than both Unity and Gnome.
As one final task for those using the AutoLogin feature in Ubuntu, you will need to set Ubuntu to use LXDE by default. You can do this with the following command:
sudo /usr/lib/lightdm/lightdm-set-defaults -s LXDE
Import & export MySQL database’s via the command line.
If your website, webapp or forum has a particularly large database, backing the database up or restoring it via PhpMyAdmin (or similar tools) can often cease to be an option. PhpMyAdmin for instance will generally struggle with files over 5MB, which isn’t all that helpful when your sites database is in the hundreds of megabytes, if not the gigabytes.
The solution, if shell access is available, is to switch to using shell commands instead. Once logged in to the server (via putty or the terminal of your a linux or OSX user) backing up the database is as simple as running
mysqldump --opt -h yourDBHost -u yourUsername -p yourDBName > backupfile.sql
(obviously with yourDBHost, yourUsername and yourDBName changed to whatever they are for your server)
Restoring the database again can be just as easy, using a command such as
cat file_to_import.sql | mysql -u yourUsername -p yourPassword -h yourDBHost yourDBName
Or if the server is windows based (Useful for importing database’s in to local WAMP or XAMPP databases)
type file_to_import.sql | mysql -u yourUsername -p yourPassword -h yourDBHost yourDBName
will perform much the same action.

