Introducing JSnip
GITHub and GIT seems to be all the rage these days so I decided it was about time I got myself an account and figured out what all the fuss was about. My problem with this plan was that I had nothing worthwhile to use it with. To solve this issue I finally got around to creating something that I’ve been contemplating making for a while now. I like to call it JSnip.
JSnip is a lightweight JavaScript based Snipping package, aimed at those who want to add interactive elements to their webpages but lack the necessary JavaScript knowledge to do so.
If you know basic HTML then useing JSnip should be a snap. Just upload the JSnip.js and JSnip.css files to your server, import them in the head of your HTML document; probably using something along the lines of:
<link rel='stylesheet' href='jsnip.css' type='text/css' />
<script type="text/javascript" src='jsnip.js'></script>
and JSnip is ready to go.
Adding Snippets to your page is as simple as adding a class name to an element. In fact that’s actually all you need to do. If you want a showHide box for instance, just type out something like:
<div class='jsnipShowHide' title='Title for your ShowHide' >
Show Hide Content
</div>
and you’ll get:
Now, if you wanted the ShowHide to be open by default, all you would need to do is add an data-mode of “open” to the tag. Thus:
<div class='jsnipShowHide' title='Title for your ShowHide' data-mode='open' >
Show Hide Content
</div>
will produce:
Adding Tabs is no more difficult, a basic set of Tabs for example need consist of no more code than:
<div class='jsnipTabs'>
	<div>
		<h2>Tab 1</h2>
		Tab 1 Content! Add tab one content here.
	</div>
	<div>
		<h2>Tab 2</h2>
		Tab 2 Content! Add tab two content here.
	</div>
	<div>
		<h2>Tab 3</h2>
		Tab 3 Content! Add tab 3 content here.
	</div>
</div>
to create a Tabs box such as the one below.
Tab 1
Tab 1 Content! Add tab one content here.
Tab 2
Tab 2 Content! Add tab two content here.
Tab 3
Tab 3 Content! Add tab 3 content here.
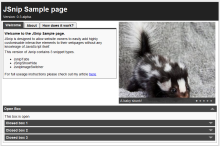
The image switcher snippet as seen in one of my past tutorials has also made it into JSnip. Thus a list of images can be transformed
<div class="jsnipImageSwitcher" style="width: 400px;">
    <img src="/demo/img/skunk.jpg" alt="A baby skunk!" />
    <img src="/demo/img/otter.jpg" alt="An otter" />
    <img src="/demo/img/bunny.jpg" alt="A Bunny Rabbit" />
</div>
into this, with only the above code.

Check out the Sample page to see how these snippets can be used together on a page.
The provided snippets are all nestable so they can be placed inside one another as much as you please, along with any other HTML you wish to add. A nice example of this is if you wanted to make the images in an ImageSwitcher link to a number of other webpages. All you would need to do is wrap the relevant image in a standard A tag pointed at where you want it to go.
The CSS behind the snippets can easily swapped out or modified to fit in with your own layout (as the snippets have been for this blog for instance), making the snippets simple to customise.
For anyone interested in the code, you can view it on my GitHub repo. I shall be creating another blog article soon, aimed at developers, explaining how it all works behind the scenes.
I’d be more then happy to answer any questions you may have in the comments section below.
Thanks for reading,
Carl


